In the last few years Social Media has become a really important factor in our lives. I think that any website, personal or a business one, should utilize Social Media as much as possible. Having Social Media Menu on your site give your visitors the option to follow you and interact more with you.
For example, we have a couple of plugin's: Buffer My Post and Tweet Old Custom Post that are hosted on WordPress.org and we are receiving a number of support/feature requests there. As we are now working on a pro version of our Buffer My Post plugin that will cover a lot of feature request, the easiest way to interact with our users was to asked them to follow our Twitter account @nytogroup in order to get the news about the release.
So, without further ado, today we are going to learn how to create the Social Media menu in WordPress. The social menu is inspired by Justin Tadlock's article which can be found here.
Our steps today will be:
- Adding Font Awesome icons to our theme (in functions.php)
- Registering Social Menu (in functions.php)
- Configuring Social Menu (in template-tags.php)
- Adding social menu to a proper location (in my case header.php)
- Adding proper styles to styles.css
Adding Font Awesome icons to our theme
In order to have the social media icons we need first to add the Font Awesome icons to our theme, if they are not already there.
We will do that by just adding one line of code, as you can see in the following code:
wp_enqueue_style( 'topcat-lite-fontawesome', get_template_directory_uri() . '/css/font-awesome.css' );
to function topcat_lite_scripts() function in our functions.php file.
NOTE: topcat_lite_scripts() is used to adding/enqueing scripts to our theme.
NOTE: topcat_lite_scripts() function is used for adding/enque-ing scripts to our theme.
NOTE: Font Awesome icons can be downloaded here: http://fortawesome.github.io/Font-Awesome/icons/
Registering Social Menu
In order to register the social menu we will only add the following:
'social' => __( 'Social Menu', 'topcat-lite' )
to register_nav_menus() function again in functions.php.
Here is the final code for that function:
register_nav_menus(
			array(
				'primary' => __( 'Primary Menu', 'topcat-lite' ),
				'social'  => __( 'Social Menu', 'topcat-lite' ),
			)
		);
Configuring Social Menu
Since my theme, topcat lite, is a revised version of _s (underscores) theme I have put my configuration code in the template-tags.php file which is available in inc directory. Here is the code:
function topcat_lite_social_menu() {
	if ( has_nav_menu( 'social' ) ) {
		wp_nav_menu(
			array(
				'theme_location'  => 'social',
				'container'       => 'div',
				'container_id'    => 'menu-social',
				'container_class' => 'menu-social',
				'menu_id'         => 'menu-social-items',
				'menu_class'      => 'menu-items',
				'depth'           => 1,
				'link_before'     => '<span class="screen-reader-text">',
				'link_after'      => '</span>',
				'fallback_cb'     => '',
			)
		);
	}
}
We are here setting up the menu and theme location with the name social. I will explain later how to setup menu in Dashboard/wp-admin .
Adding social menu to a proper location(in my case header.php)
In order to add the social menu to a proper location (in my case header.php), we just need to add the following line of code:
topcat_lite_social_menu();
Adding proper styles to styles.php
With the following code we are assigning Font Awesome icons to links in Social Media Menu. For example, if Social Media Menu contains the string "facebook.com" for Facebook, the Facebook icon \f09a will be assigned to it.
.menu-social li a[href*="dribbble.com"]::before { content: '\f17d'; }
.menu-social li a[href*="facebook.com"]::before { content: '\f09a'; }
.menu-social li a[href*="flickr.com"]::before { content: '\f16e'; }
.menu-social li a[href*="foursquare.com"]::before { content: '\f180'; }
.menu-social li a[href*="github.com"]::before { content: '\f09b'; }
.menu-social li a[href*="plus.google.com"]::before { content: '\f0d5'; }
.menu-social li a[href*="instagram.com"]::before { content: '\f16d'; }
.menu-social li a[href*="jsfiddle.com"]::before { content: '\f1cc'; }
.menu-social li a[href*="linkedin.com"]::before { content: '\f0e1'; }
.menu-social li a[href*="pinterest.com"]::before { content: '\f0d2'; }
.menu-social li a[href*="reddit.com"]::before { content: '\f1a1'; }
.menu-social li a[href*="soundcloud.com"]::before { content: '\f1be'; }
.menu-social li a[href*="stackoverflow.com"]::before { content: '\f16c'; }
.menu-social li a[href*="tumblr.com"]::before { content: '\f173'; }
.menu-social li a[href*="twitter.com"]::before { content: '\f099'; }
.menu-social li a[href*="vimeo.com"]::before { content: '\f194'; }
.menu-social li a[href*="vine.co"]::before { content: '\f1ca'; }
.menu-social li a[href*="yelp.com"]::before { content: '\f1e9'; }
.menu-social li a[href*="youtube.com"]::before { content: '\f167'; }
.menu-social li a[href*="wordpress.com"]::before { content: '\f19a'; }
.menu-social li a[href*="wordpress.org"]::before { content: '\f19a'; }
NOTE: Please make sure to style the Social Media Links in a proper way, which means that for this menu we have no need for the underline on links:
.menu-social  a:link {text-decoration: none;}
.menu-social  a:visited {text-decoration: none;}
.menu-social a:hover { text-decoration: none;}
.menu-social  a:active { text-decoration: none;}
Here is the rest of the CSS code for the social menu (in my case):
.menu-social
{
    float: left;
    width: 40%;
    position: absolute;
    right: 1.5rem;
    bottom: 4.5rem;
}
#menu-social-items
{
    margin-bottom: 0;
}
.menu-social ul {
    text-align: right;
    list-style: none;
}
.menu-social ul li {
    position: relative;
    display:  inline-block;
}
.menu-social li a:before {
    display: inline-block;
    vertical-align: bottom;
    padding: 0.5rem 0.5rem;
    font-family: 'Fontawesome';
    font-size: 1.6rem;
    -webkit-font-smoothing: antialiased;
    content: '\f08e';
}
.menu-social li a{
    color: #c7c7c7;
}
.menu-social li:hover > a
{
    color: #fff;
}
Now, when all the code is added we just need to go and setup the menu in Dashboard (wp-admin):
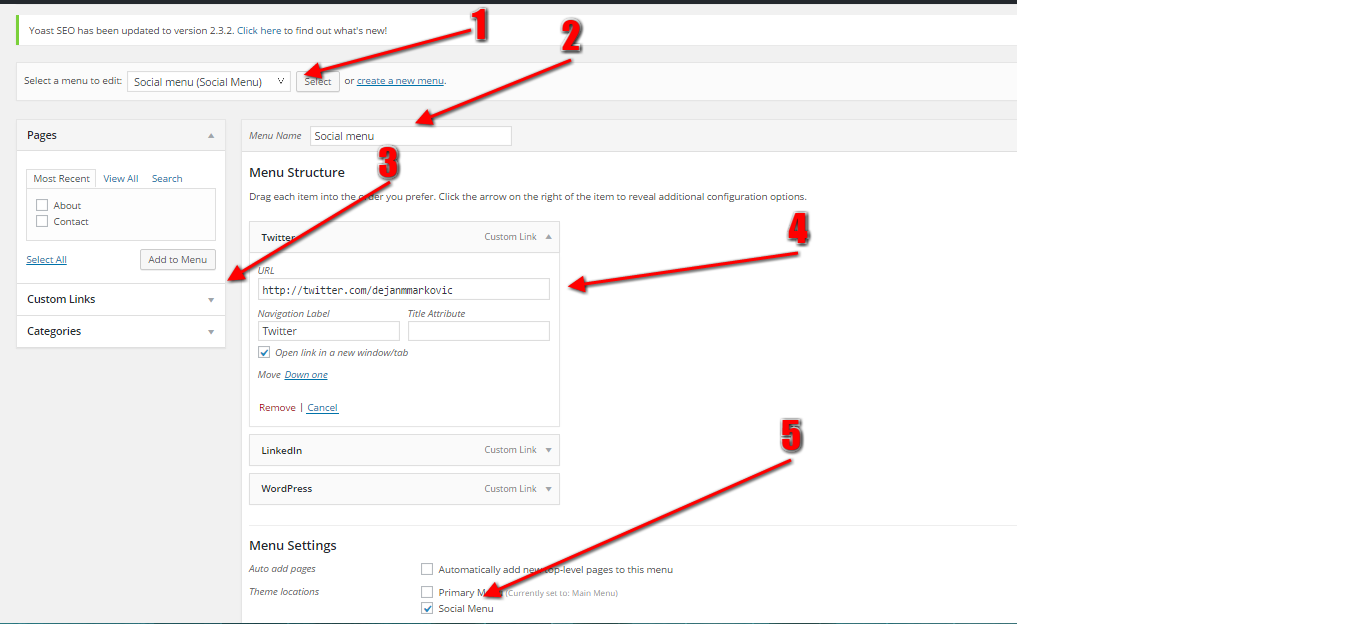
(please click on image to expand)
First, step # 1, we need to select the Social Menu as that is the menu we are going to edit.
Then, step # 2, we need to give that menu a name (Social menu is okay).
Next, step # 3 we have to add the links to the menu and for that option we should choose a Custom Links.
In the step # 4 we have to add URL to the Social Media account (in my example that is a Tweeter account).
Finally, step # 5, we need to choose the menu location and for this case we should choose Social Menu.
I have implemented this functionality in my Topcat lite theme which is a production ready version of the Topcat theme I've created in my book “WordPress Responsive Theme Design”. Since I am still waiting for Topcat lite to get approved on WordPress.org. Here is the link to the files I have used in this tutorial. As soon as Topcat lite is approved on WordPress.org I will post link a to it on this post.
UPDATE: Topcat lite just got approved on WordPress.org! Please check it out here Topcat Lite